Just like many other card games, there is a specific arrangement to where cards are located and placed. This arrangement affects where and how cards will resolve their effects, not to mention also signifying core parts of the game’s rules. Just like the previous explanation on card types, the playmat provided has also been edited with numbers for further explanation.
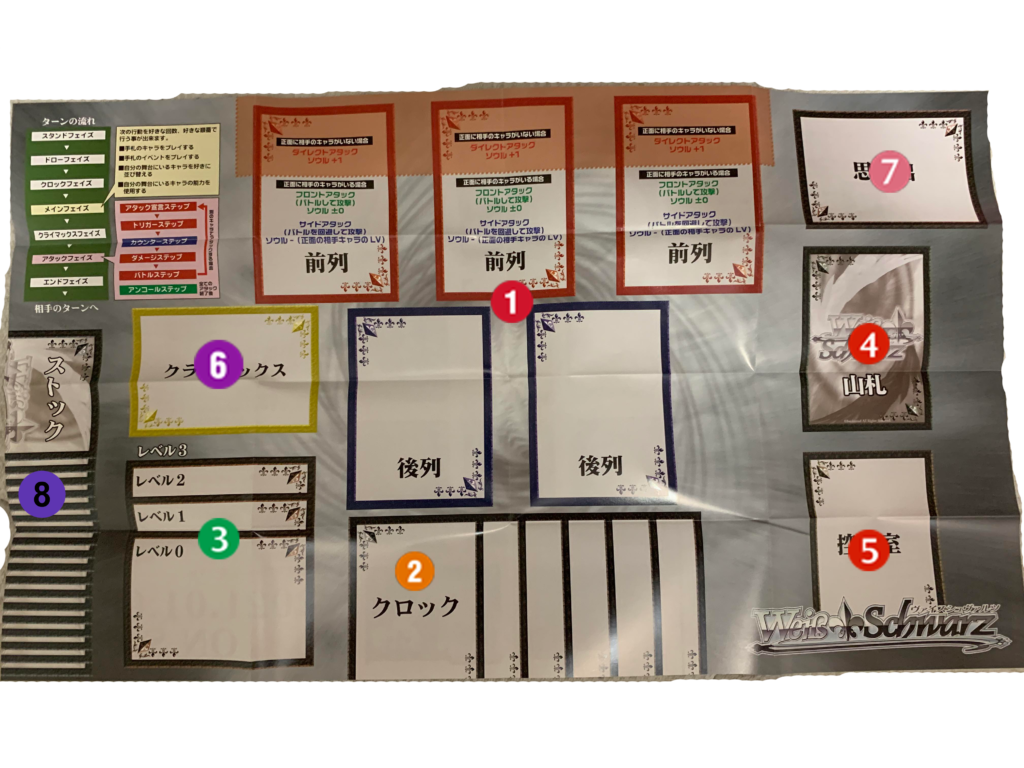
- The Stage – The stage is where your character cards are played. There are five slots, so the maximum number of characters that can be on the field at any one time is five. There are three slots in the front row and two in the backrow. Generally speaking, only characters in the front row are able to engage in combat, meaning at most, there will be three attackers per turn. Usually, backrow cards are there to provide utility effects or support power to the front row.**
- The Clock Area – This is where the soul damage you receive or self-inflict is taken. When the number of cards in this zone are equal to seven or more, you must choose one card from the first seven cards and place one into the level zone and place the other six cards into the waiting room. Then any extra cards from excess damage is placed on top of the new now empty clock area.
- The Level Area – This is where cards are placed from the clock zone when excess damage beyond the level limit is taken. When there are four cards in this zone, meaning the player has reached level 4, they lose the game.
- The Library (or the deck) – This is where the player draws cards and resolves search effects. When the last card of the deck is drawn or milled, the player must refresh (by shuffling the waiting room and placing those card into the deck zone). This is a concealed zone meaning no player may look at it at any time unless an effect says otherwise. Then the player places the top card of the new deck into the clock zone as penalty damage. (This damage cannot be canceled)
- The Waiting Room – This is where the player’s cards go to after they are defeated on stage or overplayed (the player intentionally plays a card over another). Excess cards in hand at the end of turn (hand limit is 7), paid stock, resolved clock damage from leveling, canceling or healing and end of turn climaxes are placed here. This is also where salvage effects or waiting room effects are resolved.
- Climax Zone – This is where climaxes are played during the climax phase. At the end of the turn, unless stated otherwise, the climax played here is placed into the waiting room at the start of the encore phase.
- Memory/Recollection Zone – Similar to the exile zone/banished zone in other games, cards that are placed in memory are put here instead.
- Stock Zone – Stock gained from triggers during attacks or from card effects are placed here. Stock is piled from the most recent (top) to the earliest trigger (bottom). This is a concealed zone meaning no player may look at it at any time unless an effect says otherwise.
**Backrow supports that provide ASSIST effects in front give power to the two front rows diagonal to the card itself. Meaning if for example, the assist card is on the left backrow location, power in front would be for the leftmost position and the center position.**